API思想- 如何将一系列的工具进行二次封装
前期的渗透测试很多时候都可以流程化:
信息搜集 (公司名、子公司、子域名) -> 将收集到的信息转换成IP -> 端口扫描 -> 指纹识别 -> 漏洞扫描
在各个流程中,网络上已经有很多优秀的开源工具了,重新开发有的时候并不是一个好的选择。
既然如此 ,何不写一个框架,将工具以插件的形式进行安装
框架需要实现的功能如下
mian() 主函数执行整个前期渗透测试流程,当某一个阶段任务结束后进行下一个任务。
plug_install() 运行插件的install()
plug_run() 运行某个插件
plug_uninstall() 卸载某个插件
可能需要一个web页面
插件需要实现的功能如下
install() 工具安装
update() 工具更新
paramanalysis() 输入参数解析
run() 工具运行
dataprocess() 工具输出结果二次处理
datastore() 处理后结果存储
uninstall() 卸载该插件
分布式扫描器
暂定技术栈
前端: bootstrap JQuery
后端: Go
数据库 MongoDB
消息队列: nsq
定时任务: 暂时使用循环+ sleep
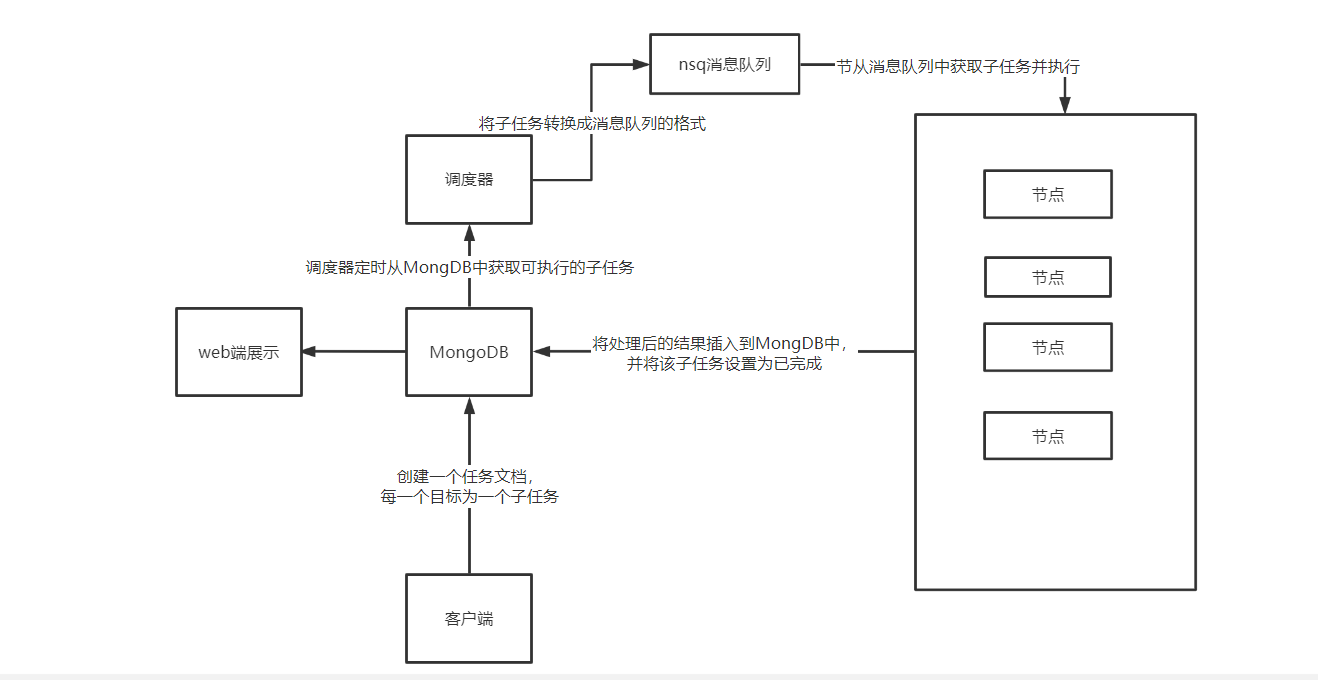
先写一下要达成的效果
用户提交任务: www.xxx.com,www.ddd.com, 等一系列IP域名地址、
客户端在MongoDB中初始化一个task,若MongoDB中记录当前无其他task,则将本task设为运行中,将IP、域名等信息插入到task中,每一个IP、域名。
调度器每5秒查询一次MongoDB,若有正在运行中的任务,且消息队列还没有排满,则从task中取出一定数量的子任务, 处理成消息的格式放入消息队列中。
执行器从消息队列中取出子任务,执行完成后,将数据更新到MongoDB的task中。
taskUID : string
{
    task_total : int
    task_waiting : int
    task_runned  : int
    task_running : int
    task_domain: {  需要进行子域名扫描, 子域名扫描完成后进行IP解析,将解析的IP:domain写入到task_IP中
        domain_total : int
        domain_running : int
        domain_runned : int
        domain1: {
            subdomain_task_status: (等待中、运行中、运行完毕)
            subdomain_info {subdomain:IP}
        }

        domain1: subdomain_task_status (等待中、运行中、运行完毕)
    }
    task_IP :{ 进行端口扫描、指纹识别,将识别到的web协议资产加入到task_web中,其他加入到task_other中
        IP_total
        IP_running
        IP_runned
        IP1 :{
            task_status(等待中、运行中、运行完成)
            task_openportanservice(开启的端口服务与指纹)
            task_domainbind [domain1 domain2](IP绑定的子域名)
        }
    }
    task_WEB:{
        web1{
        web_URL
        scan_status
    }
    }


}
MongoDB补充
清空集合数据
db.xxx.remove({})
设置集合主键
db.xxx.createIndex( { "ip_host": 1 }, { unique: true } )
docker exec -it mongo mongo admin
db.auth(“admin”,”qwrdxer”)
use myscan
db.task1_ip.insertMany([{
ip_scan_status: 0,
ip_host: “220.130.181.152”
},
{
ip_scan_status: 0,
ip_host: “140.122.149.12”
},
{
ip_scan_status: 0,
ip_host: “114.25.138.78”
}])
MongoDB设计如下
库名: myscan
db.createCollection(task1_ip)
每增加一个任务,都需要创建一个集合,并将该集合的名字记录在ScanStatus 的querylist表中
集合: ScanTask_name_ip 、ScanStatus
ScanTask_name_ip: 存放任务的ip
使用db.task1_ip.insertMany()可一次性插入多个IP
db.task1_ip.insertMany([{
    ip_scan_status: 0,
    ip_host: "220.130.181.152"
},
{
    ip_scan_status: 0,
    ip_host: "140.122.149.12"
},
{
    ip_scan_status: 0,
    ip_host: "114.25.138.78"
},
{
    ip_scan_status: 0,
    ip_host: "35.201.212.100"
},{
    ip_scan_status: 0,
    ip_host: "203.69.15.226"
},{
    ip_scan_status: 0,
    ip_host: "122.117.147.95"
},{
    ip_scan_status: 0,
    ip_host: "219.71.199.26"
},{
    ip_scan_status: 0,
    ip_host: "59.126.205.82"
},{
    ip_scan_status: 0,
    ip_host: "35.194.147.80"
},{
    ip_scan_status: 0,
    ip_host: "123.0.63.235"
},{
    ip_scan_status: 0,
    ip_host: "140.122.53.205"
},{
    ip_scan_status: 0,
    ip_host: "140.122.53.161"
},{
    ip_scan_status: 0,
    ip_host: "163.21.180.18"
},{
    ip_scan_status: 0,
    ip_host: "203.64.208.70"
},{
    ip_scan_status: 0,
    ip_host: "163.21.180.180"
},{
    ip_scan_status: 0,
    ip_host: "163.18.23.135"
}])
db.task1_ip.insertMany({
ip_scan_status: 0,
ip_host: “220.130.181.152”
})
修改某个ip的运行状态
db.scan1_ip.updateOne({ip_host: "121.5.73.12"},{"$set":{ip_scan_status:2}})
查看指定状态的所有IP
db.scan1_ip.find({"ip_scan_status":0})
ip扫描结果格式
[{
    openport:80,
    protocol:"http"
 },{
    openport:22,
    protocol:"ssh"
 },{
    openport:6379,
    protocol:"redis"
 }]
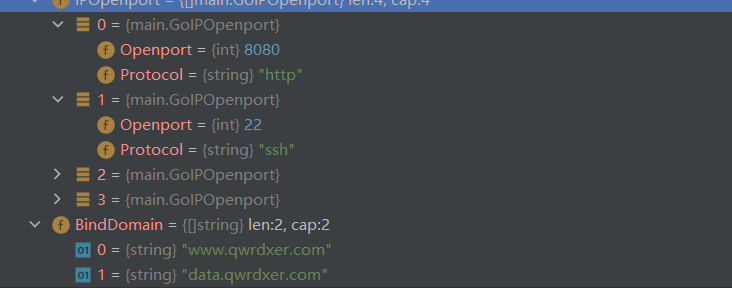
将扫描结果写入到MongoDB中
db.task1_ip.updateOne({ip_host: "121.5.73.14"},{"$set":{"ip_openport":[{
    openport:8080,
    protocol:"http"
 },{
    openport:22,
    protocol:"ssh"
 },{
    openport:6379,
    protocol:"redis"
 },{
    openport:7171,
    protocol:"http"
 }]}})
查询有http协议的ip
db.scan1_ip.find({"ip_openport.protocol":"http"})
查询有http协议的ip,只要带http的端口
cursor.forEach(function(x){
    x.ip_openport.forEach(function(arr,index){
        print(arr.openport)
    })
})
db.task1_ip.find({"ip_openport.protocol":"http"}).forEach(function(x){
    var iphost=x.ip_host
    x.ip_openport.forEach(function(arr,index){
        if(arr.protocol=="http"){
            print(iphost+":"+arr.port)
            iphost=x.ip_host
        }
    })
})
输出结果如下 ,可以将http字符串替换成任意协议,输出都为ip_端口
121.5.73.12:80
121.5.73.14:8080
121.5.73.14:7171
taskname_domain
go语言操控MongoDB
https://blog.csdn.net/opeak/article/details/102544280/
https://wenku.baidu.com/view/347a637e322b3169a45177232f60ddccda38e69f.html
连接至MongoDB
const (
   MongoDBHosts = "121.5.73.12:27017"
   AuthDatabase = "admin"
   AuthUserName = "admin"
   AuthPassword = "123456"
   MaxCon       = 300
)

func main() {

   mongoDBDialInfo := &mgo.DialInfo{
      Addrs:    []string{MongoDBHosts},
      Timeout:  60 * time.Second,
      Database: AuthDatabase,
      Username: AuthUserName,
      Password: AuthPassword,
   }

   session, err := mgo.DialWithInfo(mongoDBDialInfo)
   if err != nil {
      log.Fatalf("CreateSession failed:%n", err)
   }

   //设置连接池的大小
   session.SetPoolLimit(MaxCon)
   defer session.Close()
   cloneSession := session.Clone()
}
创建了一个连接池,当需要对MongDB进行操作时,只需
cloneSession := session.Clone() 即可获取到一个session
获取一条记录
首先要根据文档的格式定义好结构体
JSON转GO结构体
type IP_result struct {
    ID           bson.ObjectId  `bson:"_id,omitempty"` //类型是bson.ObjectId
    IPScanStatus int            `bson:"ip_scan_status"`
    IPHost       string         `bson:"ip_host"`
    IPOpenport   []GoIPOpenport `bson:"ip_openport"`
    BindDomain   []string       `bson:"binddomain"`
}

type GoIPOpenport struct {
    Openport int    `bson:"openport"`
    Protocol string `bson:"protocol"`
}
注意:
- 标签为BSON格式
- 结构体中成员必须大写,否则无法被其他包访问导致值为空
- 要加上ID属性
测试获取一条数据
    c := cloneSession.DB("myscan").C("task1_ip")
    var v = IP_result{}
    c.Find(bson.M{"ip_host": "121.5.73.14"}).One(&v)
更新文档 - 单个值
更新ip扫描状态
c.Update(bson.M{"ip_host": "121.5.73.15"}, bson.M{"$set": bson.M{"ip_scan_status": 110}})
更新文档-列表
对于不确定数量的列表,直接向bson.M中传入切片即可
c.Update(bson.M{"ip_host": "121.5.73.15"}, bson.M{"$set": bson.M{"openport": []int{11, 111, 22, 80, 3333}}})
更新文档-嵌套文档
嵌套文档,传入的是键值对 ,本次的需求是向列表成员中插入不定数量的子文档
首先,对于确定数量的子文档,嵌套bson.M即可
data2 := bson.M{"openport": []bson.M{bson.M{"port": 80, "protocol": "https"}, bson.M{"port": 8080, "protocol": "http"}}}
对于不确定数量的子文档,首先定义一个bson.M类型的切片,使用for循环赋值即可
其核心是将结构体转换成bson.M格式
    test3 := &GoIPOpenport{Openport: 80, Protocol: "https"}
    data3, _ := bson.Marshal(test3)
    mmap := bson.M{}
    bson.Unmarshal(data3, mmap)
IP扫描任务: 将 端口+指纹写入MongoDB中(单机模式)
单机模式的任务只有两种状态: 未扫描,扫描完成( 后续引入消息队列后还需要增加排队中、运行中的状态)
其核心逻辑如下:
- 获取一个任务(单机直接从MongoDB中获取,后续的分布式需要从消息队列中获取)
- 执行任务
- 上传数据,更新该任务状态
端口扫描结果为字符串切片,使用strings.Join 转成字符串格式进行nmap指纹识别
res:=strings.Join(p.openPort,",")
nmap扫描结果如下
PORT     STATE  SERVICE VERSION
22/tcp   open   ssh     OpenSSH 8.2p1 Ubuntu 4ubuntu0.2 (Ubuntu Linux; protocol 2.0)
25/tcp   closed smtp
53/tcp   open   domain  ISC BIND 9.16.1 (Ubuntu Linux)
80/tcp   open   http    Apache httpd 2.4.41 ((Ubuntu))
110/tcp  closed pop3
111/tcp  open   rpcbind 2-4 (RPC #100000)
3306/tcp open   mysql   MySQL 5.7.36
Service Info: OS: Linux; CPE: cpe:/o:linux:linux_kernel

Service detection performed. Please report any incorrect results at https://nmap.org/submit/ .
Nmap done: 1 IP address (1 host up) scanned in 15.71 seconds
使用如下代码提取出nmap结果中的协议和端口
    var res = "Starting Nmap 7.70 ( https://nmap.org ) at 2022-04-17 11:42 ?D1ú±ê×?ê±??\nNmap scan report for \nHost is up (0.063s latency).\n\nPORT    STATE  SERVICE VERSION\n22/tcp  open   ssh     OpenSSH 8.2p1 Ubuntu 4ubuntu0.2 (Ubuntu Linux; protocol 2.0)\n25/tcp  closed smtp\n53/tcp  open   domain  ISC BIND 9.16.1 (Ubuntu Linux)\n80/tcp  open   http    Apache httpd 2.4.41 ((Ubuntu))\n110/tcp closed pop3\n111/tcp open   rpcbind 2-4 (RPC #100000)\nService Info: OS: Linux; CPE: cpe:/o:linux:linux_kernel\n\nService detection performed. Please report any incorrect results at https://nmap.org/submit/ .\nNmap done: 1 IP address (1 host up) scanned in 15.48 seconds\n"
    var res1 = strings.Split(res, "\n")
    reg := regexp.MustCompile("^[0-9.]+/(?:tcp|udp)(.*)")
    for _, infos := range res1 {
        status := reg.FindAllString(infos, -1)
        if status != nil {
            info := strings.Fields(infos)
            fmt.Println(info[2])
        }
    }
具体的ip扫描逻辑如下
- 从MongoDB中读取到一条状态为0 的任务
- 取出IP
- 扫描端口指纹
- 结果解析成BSON格式
- 将IP的指纹和端口更新到MongDB中
- 将该IP状态设置为扫描成功
func main() {
    var conn mongodb.MongoPool
    conn.Init()
    defer conn.CloseSession()
    session := conn.GetSession()
    defer session.Close()
    c := session.DB("myscan").C("task1_ip")
    var task1 ipscan.IPScanTask
    var v = IP_result{}
    for{
        c.Find(bson.M{"ip_scan_status": 0}).One(&v)
        var target=v.IPHost
        task1.Init(target)
        var bonsres=task1.Scan()
        c.Update(bson.M{"ip_host": target},bson.M{"$set":bson.M{"ip_openport":bonsres}})
        c.Update(bson.M{"ip_host": target}, bson.M{"$set": bson.M{"ip_scan_status": 1}})
    }
}
分布式-调度器Monitor
先看看调度器要实现的功能:
调度器首先要确定当前是否有任务在运行,若没有则从排队中的任务中取出一个设置为运行中
因此要在mongDB中创建一个集合task_status,其存储的文档格式如下
{
    task_name:"taskname",
    task_status:0
}
task_name 就是任务的名字,需要从客户端中进行任务创建
task_status 为任务的状态,一共有三种状态
- 值为0 ,标识任务刚刚初始化
- 值为1 ,标识任务正在运行
- 值为2 ,标识任务已完成
需要用到如下MongoDB语句
c := session.DB("myscan").C("task_status")

//更新任务状态
c.Update(bson.M{"task_name": taskname}, bson.M{"$set": bson.M{"task_status": 1}})

//新增一个任务
c.Insert(bson.M{"task_name":taskname,"task_status":0})

//顺序查找一个状态为0任务
c.Find(bson.M{"task_status": 0}).Sort("time:-1").One(&v)
若当前有任务在运行,则根据任务定位到MongDB子任务集合中:
- 取出状态为0的子任务
- 将其加入写入到消息队列中
- 将子任务状态设置为2(排队中)
nsq
官方文档如下
follow the instructions in the INSTALLING doc.
in one shell, start
nsqlookupd: 这相当于一个管理员$ nsqlookupdin another shell, start
nsqd: 这是用来消息发送 ,若在公网中搭建需要制定broadcast-adddress为公网IP$ nsqd --lookupd-tcp-address=127.0.0.1:4160 -broadcast-address xxx.xxx.xxx.xxxNOTE: if your system hostname does not resolve to
127.0.0.1then add--broadcast-address=127.0.0.1in another shell, start
nsqadmin: 这是用来管理的web界面$ nsqadmin --lookupd-http-address=127.0.0.1:4161publish an initial message (creates the topic in the cluster, too): 发送一条测试消息
$ curl -d 'hello world 1' 'http://127.0.0.1:4151/pub?topic=test'
go操控nsq
https://www.cnblogs.com/binHome/p/12006392.html
消息发送测试代码
package main

import (
    "bufio"
    "fmt"
    "github.com/nsqio/go-nsq"
    "os"
    "strings"
)

// NSQ Producer Demo

// 定义nsq生产者
var producer *nsq.Producer

// 初始化生产者
func initProducer(str string) (err error) {
    // 创建配置信息
    config := nsq.NewConfig()
    // 初始化生产者 str传入ip:端口
    producer, err = nsq.NewProducer(str, config)
    if err != nil {
        fmt.Printf("create producer failed, err:%v\n", err)
        return err
    }
    // 测试生产者是否有效
    err = producer.Ping()
    if err != nil{
        fmt.Printf("No ping,err:%v\n",err)
        producer.Stop() //关闭生产者
    }
    return nil
}

func main() {
    nsqAddress := "121.5.73.12:4150"
    // 调用封装好的函数 初始化生产者
    err := initProducer(nsqAddress)
    if err != nil {
        fmt.Printf("init producer failed, err:%v\n", err)
        return
    }

    reader := bufio.NewReader(os.Stdin) // 从标准输入读取
    for {
        data, err := reader.ReadString('\n')
        if err != nil {
            fmt.Printf("read string from stdin failed, err:%v\n", err)
            continue
        }
        data = strings.TrimSpace(data)
        if strings.ToUpper(data) == "Q" { // 输入Q退出
            break
        }
        // 使用Publish 向 'topic_demo' publish 数据
        err = producer.Publish("test", []byte(data))
        if err != nil {
            fmt.Printf("publish msg to nsq failed, err:%v\n", err)
            continue
        }
    }
}
消息接收测试代码
// nsq_consumer/main.go
package main

import (
    "fmt"
    "os"
    "os/signal"
    "syscall"
    "time"

    "github.com/nsqio/go-nsq"
)

// NSQ Consumer Demo

// MyHandler 是一个消费者类型
type MyHandler struct {
    Title string
}

// HandleMessage 是需要实现的处理消息的方法 *必须要实现
func (m *MyHandler) HandleMessage(msg *nsq.Message) (err error) {
    fmt.Printf("%s recv from %v, msg:%v\n", m.Title, msg.NSQDAddress, string(msg.Body))
    time.Sleep(time.Duration(2)*time.Second)
    return
}

// 初始化消费者
func initConsumer(topic string, channel string, address string) (err error) {
    config := nsq.NewConfig()
    // 重连时间
    config.LookupdPollInterval = 15 * time.Second
    // 新建消费者
    c, err := nsq.NewConsumer(topic, channel, config)
    if err != nil {
        fmt.Printf("create consumer failed, err:%v\n", err)
        return
    }
    consumer := &MyHandler{
        Title: "qwrdxer",
    }
    // 屏蔽系统日志
    // c.SetLogger(nil,0)
    // 添加消费者
    c.AddHandler(consumer)

    // if err := c.ConnectToNSQD(address); err != nil { // 直接连NSQD
    if err := c.ConnectToNSQLookupd(address); err != nil { // 通过lookupd查询
        return err
    }
    return nil

}

func main() {
    err := initConsumer("test", "tttt", "121.5.73.12:4161")
    if err != nil {
        fmt.Printf("init consumer failed, err:%v\n", err)
        return
    }
    c := make(chan os.Signal)        // 定义一个信号的通道
    signal.Notify(c, syscall.SIGINT) // 转发键盘中断信号到c
    <-c                              // 阻塞
}
调度器代码实现
- 初始化nsq 、Mongodb连接
- 从mongdb中提取指定数量消息
- for循环,每向消息队列中写入一条消息,将该消息对应的mongodb文档设置为排队中
- sleep10秒
package main

import (
    "fmt"
    "github.com/nsqio/go-nsq"
    "gopkg.in/mgo.v2"
    "gopkg.in/mgo.v2/bson"
    mongodb "qwrdxer.com/NODE/MONGODB"
    "time"
)
type IP_result struct {
    ID           bson.ObjectId  `bson:"_id,omitempty"` //类型是bson.ObjectId
    IPScanStatus int            `bson:"ip_scan_status"`
    IPHost       string         `bson:"ip_host"`
    IPOpenport   []GoIPOpenport `bson:"ip_openport"`
    BindDomain   []string       `bson:"binddomain"`
}

type GoIPOpenport struct {
    Openport int    `bson:"openport"`
    Protocol string `bson:"protocol"`
}
// NSQ Producer Demo

type Monitor struct {
    producer *nsq.Producer
    mgoconn *mgo.Session
    querynum int  //每次查询的任务数
    waitTime int  //一次调度后等待的时间
}
// 初始化生产者
func (m *Monitor)Init(ipport string) (err error) {
    // 创建配置信息
    config := nsq.NewConfig()
    // 初始化生产者 str传入ip:端口
    m.producer, err = nsq.NewProducer(ipport, config)
    if err != nil {
        fmt.Printf("create producer failed, err:%v\n", err)
        return err
    }
    // 测试生产者是否有效
    err = m.producer.Ping()
    if err != nil{
        fmt.Printf("No ping,err:%v\n",err)
        m.producer.Stop() //关闭生产者
    }
    return nil
}
func (m *Monitor)Start(conn mongodb.MongoPool) {
    for{
        m.mgoconn=conn.GetSession()//建立mongodb连接
        c :=m.mgoconn.DB("myscan").C("task1_ip")
        iter:=c.Find(bson.M{"ip_scan_status": 0}).Limit(2).Iter()
        var v = IP_result{}
        for iter.Next(&v) { //迭代子任务
            var data="ipscan;"+"task1_ip;"+v.IPHost
            fmt.Println("adding:"+ data)
            err := m.producer.Publish("test", []byte(data))//写入消息队列
            c.Update(bson.M{"ip_host": v.IPHost}, bson.M{"$set": bson.M{"ip_scan_status": 2}})//设置状态为排队中
            if err != nil {
                fmt.Printf("publish msg to nsq failed, err:%v\n", err)
                continue
            }
        }
        m.mgoconn.Close() //关闭连接
        fmt.Println("睡眠十秒")
        time.Sleep(time.Duration(10)*time.Second)
    }
}
func main() {
    //建立mongdb连接池
    var conn mongodb.MongoPool
    conn.Init()
    defer conn.CloseSession()
    var Mon =Monitor{}
    Mon.Init("121.5.73.12:4150")
    Mon.Start(conn)
}
分布式架构设计
扫描节点
其主函数逻辑如下
func main() {
    task := 0
    taskLimit := 5
    taskList := make([]PortScanTask, 0)
    消息队列绑定
    for {
        if task<taskLimit{
            从消息队列中获取子任务
            根据任务类别创建一个任务
            将该任务加入到taskList中
            go run 运行该任务
        }
        遍历taskList,若有任务已完成,则将其从任务列表中删除
        sleep(10)
    }
}
任务函数需要实现的接口如下
interface task{
    init(); 将参数初始化
    run() ; 执行任务
    getprocess();获取当前任务进度
    dataprocess(); 将运行结果改为JSON格式
    upload(); 上传结果到MongoDB中,修改部分参数,如running-1 runned+1

    实现接口的任务中还要定义一个标志位,当任务结束后方便主函数将其从任务列表中删除
}
调度节点
主函数逻辑如下
func main() {
    for {
        获取消息队列中可用的
        sleep(10)
    }
}
客户端
参考文章
Go执行系统命令并处理
https://wenku.baidu.com/view/97c2e105de36a32d7375a417866fb84ae45cc3f0.html
转载请注明来源,欢迎对文章中的引用来源进行考证,欢迎指出任何有错误或不够清晰的表达。可以在下面评论区评论,也可以邮件至 1944270374@qq.com