Quick Start
示例代码演示如何创建两个Agent(实现了数学减少、条件判断等功能)
- 代码中定义了两个Agent,Modifier负责修改给定的数字,而Check根据条件进行数值检查, 同时还定义了一个 Message类,用于定义Agent之间传递的消息。
- Agent中, 初始化部分可以传入可用的工具,handler_message为消息处理逻辑实现
```python
from dataclasses import dataclass
from typing import Callable
from autogen_core import DefaultTopicId, MessageContext, RoutedAgent, default_subscription, message_handler
@dataclass
class Message:
content: int
@default_subscription
class Modifier(RoutedAgent):
def init(self, modify_val: Callable[[int], int]) -> None:
super().init(“A modifier agent.”)
self._modify_val = modify_val
@message_handler
async def handle_message(self, message: Message, ctx: MessageContext) -> None:
    val = self._modify_val(message.content)
    print(f"{'-'*80}\nModifier:\nModified {message.content} to {val}")
    await self.publish_message(Message(content=val), DefaultTopicId())  # type: ignore
@default_subscription
class Checker(RoutedAgent):
def init(self, run_until: Callable[[int], bool]) -> None:
super().init(“A checker agent.”)
self._run_until = run_until
@message_handler
async def handle_message(self, message: Message, ctx: MessageContext) -> None:
    if not self._run_until(message.content):
        print(f"{'-'*80}\nChecker:\n{message.content} passed the check, continue.")
        await self.publish_message(Message(content=message.content), DefaultTopicId())
    else:
        print(f"{'-'*80}\nChecker:\n{message.content} failed the check, stopping.")
- 代理的消息处理、工具使用,都与消息传递完全解耦,Autogen框架提供了一个通信基础设施,我们通过编写Agent实现对消息的处理。我们将这个通信基础设施称为Agent Runtime
- Agent运行时除了传递消息外,还管理Agent的生命周期


下面代码演示如何使用 `SingleThreadedAgentRuntime` 实现

```python
from autogen_core import AgentId, SingleThreadedAgentRuntime

# Create an local embedded runtime.
runtime = SingleThreadedAgentRuntime()

# Register the modifier and checker agents by providing
# their agent types, the factory functions for creating instance and subscriptions.
await Modifier.register(
    runtime,
    "modifier",
    # Modify the value by subtracting 1
    lambda: Modifier(modify_val=lambda x: x - 1),
)

await Checker.register(
    runtime,
    "checker",
    # Run until the value is less than or equal to 1
    lambda: Checker(run_until=lambda x: x <= 1),
)

# Start the runtime and send a direct message to the checker.
runtime.start()
await runtime.send_message(Message(10), AgentId("checker", "default"))
await runtime.stop_when_idle()
Core Concepts
Agent与 Multi-Agent应用程序
Agent是一个软件实体,它通过消息进行通信,维护自己的状态,并执行作以响应收到的消息或其状态的更改。这些作可能会修改代理的状态并产生外部效果,例如更新消息日志、发送新消息、执行代码或进行 API 调用。
MultiAgent中 每个代理都是一个独立的单元,可以独立开发、测试和部署。这种模块化设计允许在不同的场景中重复使用代理,并组合成更复杂的系统。
Agent Runtime Environment
框架提供了 运行时环境,可促进代理之间的通信,管理其身份和生命周期,并强制实施安全和隐私边界。
它支持两种类型的运行时环境:_独立_和_分布式_。这两种类型都提供了一组用于构建多代理应用程序的通用 API,因此您可以在它们之间切换,而无需更改代理实现。每种类型也可以有多个实现。
独立运行时适用于所有代理都以相同的编程语言实现并在同一进程中运行的单进程应用程序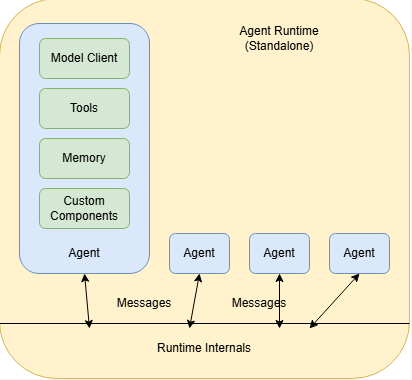
在这里,代理通过运行时通过消息进行通信,而运行时管理代理的_生命周期_。
开发人员可以使用提供的组件快速构建代理,包括 _路由代理_、AI 模型_客户端_、AI 模型工具、代码执行沙箱、模型上下文存储等。他们还可以从头开始实现自己的代理,或使用其他库。
分布式运行时适用于多进程应用程序,其中代理可以用不同的编程语言实现并在不同的机器上运行。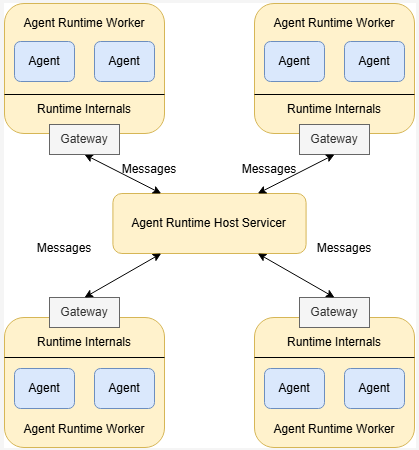
如上图所示,分布式运行时由一个_主机 servicer_ 和多个 worker 组成。Host Servicer 可促进 Agent 之间跨 Worker 的通信,并维护连接状态。worker 运行代理并通过_网关_与主机服务商通信。他们向主机服务商公布他们运行的代理并管理代理的生命周期。
Application Stack
下图展示了框架的应用程序栈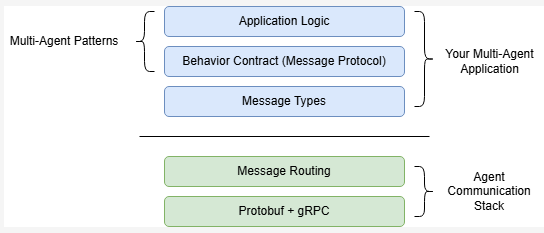
堆栈的底部是基本的消息传递和路由工具,使代理能够相互通信。这些由代理运行时管理,对于大多数应用程序,开发人员只需与运行时提供的高级 API 进行交互
顶部是需要开发人员去实现的:Agent之间的消息类型。消息的类型构成了Agent必须遵守的行为约定,这些行为约定决定了 Agent如何处理消息。
示例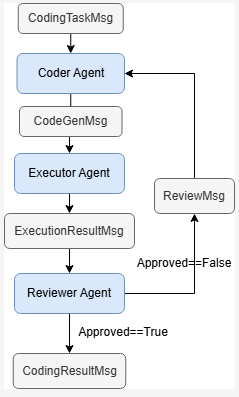
考虑一个用于代码生成的多代理应用程序的具体示例。该应用程序由三个代理组成:Coder Agent、Executor Agent 和 Reviewer Agent。
- 行为协定是通过Agent 对消息处理来实现的,如
Reviewer Agent监听ExecutionResultMsg并进行处理,决定发送哪一条消息。
Agent Identity and Lifecycle
Agent runtime 管理Agent的身份和生命周期, 应用程序通过工厂函数注册并创建Agent实例
Agent ID 唯一标识一个Agent runtime中运行的实例 Agent ID = (Agent Type, Agent Key)
Agent runtime 当运行时根据ID将消息发送到Agent实例时,它会获取该实例,或者如果该实例不存在,则创建该实例。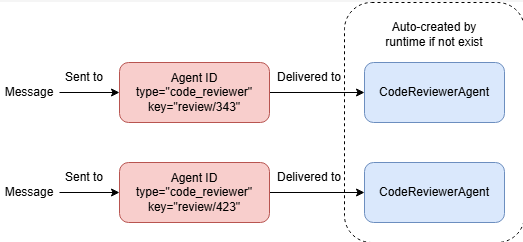
Topic and Subscription
runtime有两种方法传递消息:直接传递(1v1)或者广播(1vN)。
本节重点介绍广播中的核心概念:topic 和 subscription。
Topic 由两部分组成: topic type 和topic source
- type通常由应用程序代码定义,以标记主题所针对的消息类型。
- source 是主题类型中主题的唯一标识符。它通常由应用程序数据定义。
Subscription
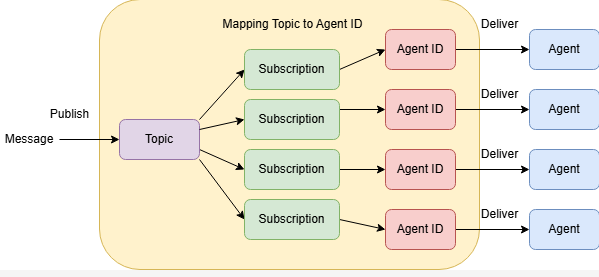
上图显示了 topic 和 subscription 之间的关系。代理运行时跟踪订阅,并使用它们向代理发送消息。
如果某个主题没有订阅,则发布到该主题的消息将不会传送到任何代理。如果一个主题有多个订阅,则消息将在所有订阅之后仅传送给每个收件人代理一次。应用程序可以使用代理运行时的 API 添加或删除订阅。
Type-Based SubScription
Agent ID = (Agent Type, Agent Key)
Topic = (Topic Type, Topic Source)
Autogen实现的订阅关系为基于类型的订阅Type-Based Subscription = Topic Type –> Agent Type
Tenant 通常是指处理特定用户会话或特定请求的一组Agent
Single-Tenant, Single Topic
topic=default source=default
发送到此topic的消息将发送给所有类型的所有Agent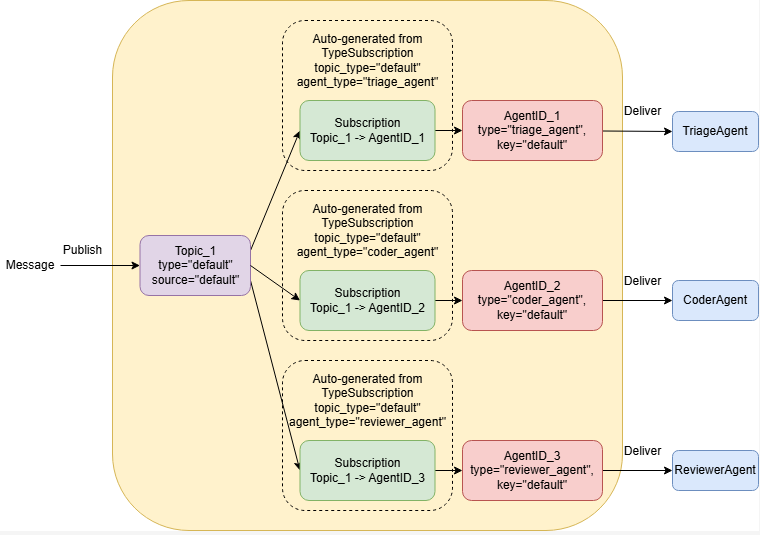
Single-Tenant, Multiple Topic
发布到主题 (“triage”, “default”) 将传递给类型为 “triage_agent”,以及发布到该主题的任何消息 (“coding”, “default”) 将传递给类型为 “coder_agent”和“reviewer_agent”。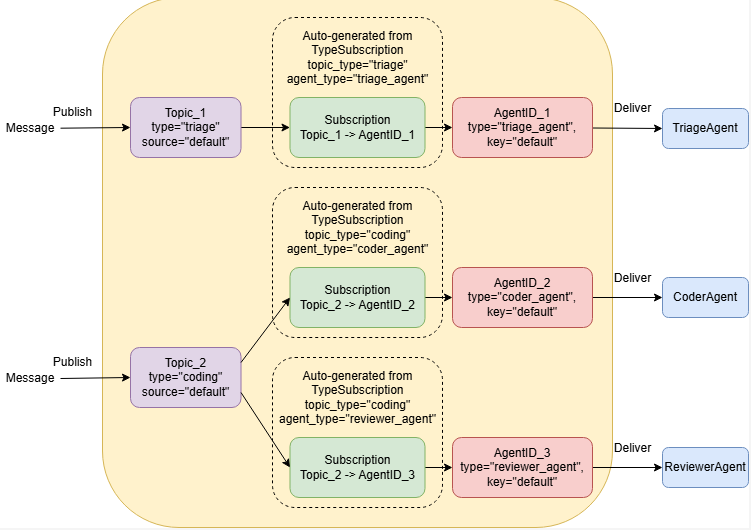
Multi-Tenant Scenarios
一个场景是多个相同的Agent同时且隔离的处理相同类型的问题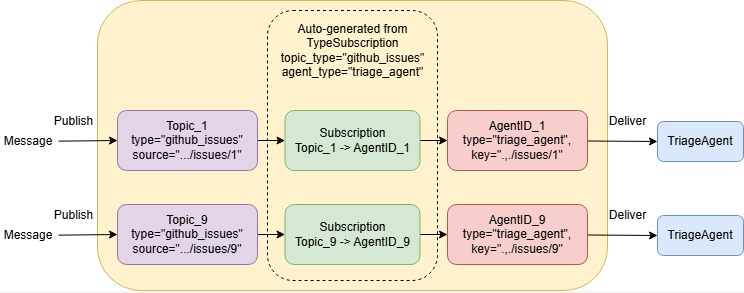
框架介绍
Agent 与Agent 运行时
Agent 可以由Agent , RoutedAgent子类化
from dataclasses import dataclass
from autogen_core import AgentId, MessageContext, RoutedAgent, message_handler

@dataclass
class MyMessageType:
    content: str

class MyAgent(RoutedAgent):
    def __init__(self) -> None:
        super().__init__("MyAgent")

    @message_handler
    async def handle_my_message_type(self, message: MyMessageType, ctx: MessageContext) -> None:
        print(f"{self.id.type} received message: {message.content}")
创建Agent: 定义传递的消息类型 实现message_handler方法
将AgentChat的代理应用在core
from autogen_agentchat.agents import AssistantAgent
from autogen_agentchat.messages import TextMessage
from autogen_ext.models.openai import OpenAIChatCompletionClient


class MyAssistant(RoutedAgent):
    def __init__(self, name: str) -> None:
        super().__init__(name)
        model_client = OpenAIChatCompletionClient(model="gpt-4o")
        self._delegate = AssistantAgent(name, model_client=model_client)

    @message_handler
    async def handle_my_message_type(self, message: MyMessageType, ctx: MessageContext) -> None:
        print(f"{self.id.type} received message: {message.content}")
        response = await self._delegate.on_messages(
            [TextMessage(content=message.content, source="user")], ctx.cancellation_token
        )
        print(f"{self.id.type} responded: {response.chat_message.content}")
注册Agent Type
要使Agent对运行时可用,开发人员可以使用 register() 类方法 注册过程将代理类型Type(由字符串唯一标识)与工厂函数(创建给定类的代理类型的实例)相关联。工厂函数用于允许在需要时自动创建 agent 实例。
from autogen_core import SingleThreadedAgentRuntime

runtime = SingleThreadedAgentRuntime()
await MyAgent.register(runtime, "my_agent", lambda: MyAgent())
await MyAssistant.register(runtime, "my_assistant", lambda: MyAssistant("my_assistant"))
AgentType(type=’my_assistant’)
Running the Single-Threaded Agent Runtime
注册代理类型后,我们可以使用 AgentId 向代理实例发送直接消息。运行时将在首次向此实例传递消息时创建实例。
runtime.start()  # Start processing messages in the background.
await runtime.send_message(MyMessageType("Hello, World!"), AgentId("my_agent", "default"))
await runtime.send_message(MyMessageType("Hello, World!"), AgentId("my_assistant", "default"))
await runtime.stop()  # Stop processing messages in the background.

await runtime.stop_when_idle()  # This will block until the runtime is idle.
Message
可以通过 dataclass创建一个Message类
from dataclasses import dataclass


@dataclass
class TextMessage:
    content: str
    source: str


@dataclass
class ImageMessage:
    url: str
    source: str
当Agent收到消息时,运行时将调用Agent的消息处理程序 (on_message())
基类 BaseAgent 不提供消息处理逻辑,开发人员应从实现提供内置消息路由功能的 RoutedAgent 基类开始。
通过Message的类型进行路由
以下类型路由代理响应 TextMessage 和 ImageMessage 使用不同的消息处理程序:
from autogen_core import AgentId, MessageContext, RoutedAgent, SingleThreadedAgentRuntime, message_handler


class MyAgent(RoutedAgent):
    @message_handler
    async def on_text_message(self, message: TextMessage, ctx: MessageContext) -> None:
        print(f"Hello, {message.source}, you said {message.content}!")

    @message_handler
    async def on_image_message(self, message: ImageMessage, ctx: MessageContext) -> None:
        print(f"Hello, {message.source}, you sent me {message.url}!")
路由相同类型的消息
在某些情况下,将相同类型的消息路由到不同的处理程序非常有用。例如,来自不同发件人代理的消息应该以不同的方式处理。您可以使用 message_handler() 装饰器的 match 参数。
class RoutedBySenderAgent(RoutedAgent):
    @message_handler(match=lambda msg, ctx: msg.source.startswith("user1"))  # type: ignore
    async def on_user1_message(self, message: TextMessage, ctx: MessageContext) -> None:
        print(f"Hello from user 1 handler, {message.source}, you said {message.content}!")

    @message_handler(match=lambda msg, ctx: msg.source.startswith("user2"))  # type: ignore
    async def on_user2_message(self, message: TextMessage, ctx: MessageContext) -> None:
        print(f"Hello from user 2 handler, {message.source}, you said {message.content}!")

    @message_handler(match=lambda msg, ctx: msg.source.startswith("user2"))  # type: ignore
    async def on_image_message(self, message: ImageMessage, ctx: MessageContext) -> None:
        print(f"Hello, {message.source}, you sent me {message.url}!")
Direct Messageing
AutoGen Core 中有两种类型的通信:
- Direct Messaging (直接消息):向另一个Agent发送 Direct Message。
- Broadcast:向 Topic 发布消息。
要将直接消息发送到另一个Agent,请在消息处理(on_message())中使用该方法 autogen_core.BaseAgent.send_message()
Request/Response
直接消息传递可用于请求/响应方案,其中发送方希望接收方的响应。接收方可以通过从其消息处理程序返回值来响应消息。您可以将其视为Agent之间的函数调用。
from dataclasses import dataclass

from autogen_core import MessageContext, RoutedAgent, SingleThreadedAgentRuntime, message_handler


@dataclass
class Message:
    content: str


class InnerAgent(RoutedAgent):
    @message_handler
    async def on_my_message(self, message: Message, ctx: MessageContext) -> Message:
        return Message(content=f"Hello from inner, {message.content}")


class OuterAgent(RoutedAgent):
    def __init__(self, description: str, inner_agent_type: str):
        super().__init__(description)
        self.inner_agent_id = AgentId(inner_agent_type, self.id.key)

    @message_handler
    async def on_my_message(self, message: Message, ctx: MessageContext) -> None:
        print(f"Received message: {message.content}")
        # Send a direct message to the inner agent and receives a response.
        response = await self.send_message(Message(f"Hello from outer, {message.content}"), self.inner_agent_id)
        print(f"Received inner response: {response.content}")

runtime = SingleThreadedAgentRuntime()
await InnerAgent.register(runtime, "inner_agent", lambda: InnerAgent("InnerAgent"))
await OuterAgent.register(runtime, "outer_agent", lambda: OuterAgent("OuterAgent", "inner_agent"))
runtime.start()
outer_agent_id = AgentId("outer_agent", "default")
await runtime.send_message(Message(content="Hello, World!"), outer_agent_id)
await runtime.stop_when_idle()
Received message: Hello, World!
Received inner response: Hello from inner, Hello from outer, Hello, World!
Broadcast
直接消息传递和广播之间的主要区别在于,广播不能用于请求/响应场景。当代理发布消息时,它只是单向的,它无法从任何其他代理接收响应,即使接收代理的处理程序返回值也是如此。
订阅消息 & 主题发布消息
基于类型的订阅将 发布到给定 topic type的主题的消息发送给 给定Agent type的Agent实例
使用type_subscription()来订阅指定类型的主题
from autogen_core import RoutedAgent, message_handler, type_subscription


@type_subscription(topic_type="default")
class ReceivingAgent(RoutedAgent):
    @message_handler
    async def on_my_message(self, message: Message, ctx: MessageContext) -> None:
        print(f"Received a message: {message.content}")
要 发布消息,使用 publish_message()
from autogen_core import TopicId


class BroadcastingAgent(RoutedAgent):
    @message_handler
    async def on_my_message(self, message: Message, ctx: MessageContext) -> None:
    # 在Agent中发布消息
        await self.publish_message(
            Message("Publishing a message from broadcasting agent!"),
            topic_id=TopicId(type="default", source=self.id.key),
        )

# 通过runtime 发布消息
await runtime.publish_message(
    Message("Hello, World! From the runtime!"), topic_id=TopicId(type="default", source="default")
)
测试
from autogen_core import TypeSubscription

runtime = SingleThreadedAgentRuntime()

# Option 1: with type_subscription decorator
# The type_subscription class decorator automatically adds a TypeSubscription to
# the runtime when the agent is registered.
await ReceivingAgent.register(runtime, "receiving_agent", lambda: ReceivingAgent("Receiving Agent"))

# Option 2: with TypeSubscription
await BroadcastingAgent.register(runtime, "broadcasting_agent", lambda: BroadcastingAgent("Broadcasting Agent"))
await runtime.add_subscription(TypeSubscription(topic_type="default", agent_type="broadcasting_agent"))

# Start the runtime and publish a message.
runtime.start()
await runtime.publish_message(
    Message("Hello, World! From the runtime!"), topic_id=TopicId(type="default", source="default")
)
await runtime.stop_when_idle()
- 通过type_subscription(topic_type=”default”) 来让Agent绑定 Topic
- 也可以通过runtime.add_subscription(TypeSubscription(topic_type=”default”, agent_type=”broadcasting_agent”)) 开为Agnt绑定Topic
- 发布消息通过
.publish_message进行
默认主题和订阅
当所有代理发布和订阅所有广播的消息, 我们可以使用便捷类 DefaultTopicId 和 default_subscription() 来简化我们的代码。
publish_message(
            Message("Publishing a message from broadcasting agent!"),
            topic_id=DefaultTopicId(),
        )
Distributed Agent Runtime
分布式代理运行时有助于跨进程边界进行通信和代理生命周期管理。它由一个主机服务和至少一个 worker 运行时组成。
Host
可以通过 GrpcWorkerAgentRuntimeHost开启一个主机服务
import asyncio
from autogen_ext.runtimes.grpc import GrpcWorkerAgentRuntimeHost

async def main():
    host = GrpcWorkerAgentRuntimeHost(address="localhost:50051")
    host.start()  # Start a host service in the background.
    await host.stop_when_signal()

if __name__ == "__main__":
    asyncio.run(main())
worker
Agent
from dataclasses import dataclass

from autogen_core import DefaultTopicId, MessageContext, RoutedAgent, default_subscription, message_handler


@dataclass
class MyMessage:
    content: str


@default_subscription
class MyAgent(RoutedAgent):
    def __init__(self, name: str) -> None:
        super().__init__("My agent")
        self._name = name
        self._counter = 0

    @message_handler
    async def my_message_handler(self, message: MyMessage, ctx: MessageContext) -> None:
        self._counter += 1
        if self._counter > 5:
            return
        content = f"{self._name}: Hello x {self._counter}"
        print(content)
        await self.publish_message(MyMessage(content=content), DefaultTopicId())
运行
import asyncio

from autogen_ext.runtimes.grpc import GrpcWorkerAgentRuntime

worker1 = GrpcWorkerAgentRuntime(host_address="localhost:50051")
await worker1.start()
await MyAgent.register(worker1, "worker1", lambda: MyAgent("worker1"))

worker2 = GrpcWorkerAgentRuntime(host_address="localhost:50051")
await worker2.start()
await MyAgent.register(worker2, "worker2", lambda: MyAgent("worker2"))

#由 worker2开始广播
await worker2.publish_message(MyMessage(content="Hello!"), DefaultTopicId())

# Let the agents run for a while.
await asyncio.sleep(5)
关闭
await worker1.stop()
await worker2.stop()
组件指南
AutoGen 提供了一套内置的模型客户端,用于使用 ChatCompletion API。所有模型客户端都实现 ChatCompletionClient 协议类。
openai
pip install "autogen-ext[openai]"
from autogen_core.models import UserMessage
from autogen_ext.models.openai import OpenAIChatCompletionClient

# Create an OpenAI model client.
model_client = OpenAIChatCompletionClient(
    model="gpt-4o",
    # api_key="sk-...", # Optional if you have an API key set in the environment.
)
Azure OpenAI
pip install "autogen-ext[openai,azure]"
from autogen_ext.models.openai import AzureOpenAIChatCompletionClient
from azure.identity import DefaultAzureCredential, get_bearer_token_provider

# Create the token provider
token_provider = get_bearer_token_provider(DefaultAzureCredential(), "https://cognitiveservices.azure.com/.default")

az_model_client = AzureOpenAIChatCompletionClient(
    azure_deployment="{your-azure-deployment}",
    model="{model-name, such as gpt-4o}",
    api_version="2024-06-01",
    azure_endpoint="https://{your-custom-endpoint}.openai.azure.com/",
    azure_ad_token_provider=token_provider,  # Optional if you choose key-based authentication.
    # api_key="sk-...", # For key-based authentication.
)
Azure AI Foundry
import os

from autogen_core.models import UserMessage
from autogen_ext.models.azure import AzureAIChatCompletionClient
from azure.core.credentials import AzureKeyCredential

client = AzureAIChatCompletionClient(
    model="Phi-4",
    endpoint="https://models.inference.ai.azure.com",
    # To authenticate with the model you will need to generate a personal access token (PAT) in your GitHub settings.
    # Create your PAT token by following instructions here: https://docs.github.com/en/authentication/keeping-your-account-and-data-secure/managing-your-personal-access-tokens
    credential=AzureKeyCredential(os.environ["GITHUB_TOKEN"]),
    model_info={
        "json_output": False,
        "function_calling": False,
        "vision": False,
        "family": "unknown",
    },
)

result = await client.create([UserMessage(content="What is the capital of France?", source="user")])
print(result)
ollama
from autogen_core.models import UserMessage
from autogen_ext.models.ollama import OllamaChatCompletionClient

# Assuming your Ollama server is running locally on port 11434.
ollama_model_client = OllamaChatCompletionClient(model="llama3.2")

response = await ollama_model_client.create([UserMessage(content="What is the capital of France?", source="user")])
print(response)
使用 Model Client创建Agent
- 在初始化时 指定client
- 将自定义的Message封装成client能接受的Message
- 在处理消息时调用client
from dataclasses import dataclass

from autogen_core import MessageContext, RoutedAgent, SingleThreadedAgentRuntime, message_handler
from autogen_core.models import ChatCompletionClient, SystemMessage, UserMessage
from autogen_ext.models.openai import OpenAIChatCompletionClient


@dataclass
class Message:
    content: str


class SimpleAgent(RoutedAgent):
    def __init__(self, model_client: ChatCompletionClient) -> None:
        super().__init__("A simple agent")
        self._system_messages = [SystemMessage(content="You are a helpful AI assistant.")]
        self._model_client = model_client

    @message_handler
    async def handle_user_message(self, message: Message, ctx: MessageContext) -> Message:
        # Prepare input to the chat completion model.
        user_message = UserMessage(content=message.content, source="user")
        response = await self._model_client.create(
            self._system_messages + [user_message], cancellation_token=ctx.cancellation_token
        )
        # Return with the model's response.
        assert isinstance(response.content, str)
        return Message(content=response.content)
# Create the runtime and register the agent.
from autogen_core import AgentId

runtime = SingleThreadedAgentRuntime()
await SimpleAgent.register(
    runtime,
    "simple_agent",
    lambda: SimpleAgent(
        OpenAIChatCompletionClient(
            model="gpt-4o-mini",
            # api_key="sk-...", # Optional if you have an OPENAI_API_KEY set in the environment.
        )
    ),
)
# Start the runtime processing messages.
runtime.start()
# Send a message to the agent and get the response.
message = Message("Hello, what are some fun things to do in Seattle?")
response = await runtime.send_message(message, AgentId("simple_agent", "default"))
print(response.content)
# Stop the runtime processing messages.
await runtime.stop()
模型上下文
模型上下文支持存储和检索 Chat Completion 消息。它始终与模型客户端一起使用,以生成LLM基于 的响应。
BufferedChatCompletionContext 是存储最近N个消息
model context使用方式是,在Agent中创建 model context ,在处理时,将其传给client
class SimpleAgentWithContext(RoutedAgent):
    def __init__(self, model_client: ChatCompletionClient) -> None:
        super().__init__("A simple agent")
        self._system_messages = [SystemMessage(content="You are a helpful AI assistant.")]
        self._model_client = model_client
        self._model_context = BufferedChatCompletionContext(buffer_size=5)

    @message_handler
    async def handle_user_message(self, message: Message, ctx: MessageContext) -> Message:
        # Prepare input to the chat completion model.
        user_message = UserMessage(content=message.content, source="user")
        # Add message to model context.
        await self._model_context.add_message(user_message)
        # Generate a response.
        response = await self._model_client.create(
            self._system_messages + (await self._model_context.get_messages()),
            cancellation_token=ctx.cancellation_token,
        )
        # Return with the model's response.
        assert isinstance(response.content, str)
        # Add message to model context.
        await self._model_context.add_message(AssistantMessage(content=response.content, source=self.metadata["type"]))
        return Message(content=response.content)
现在让我们尝试在第一个问题之后提出后续问题。
runtime = SingleThreadedAgentRuntime()
await SimpleAgentWithContext.register(
    runtime,
    "simple_agent_context",
    lambda: SimpleAgentWithContext(
        OpenAIChatCompletionClient(
            model="gpt-4o-mini",
            # api_key="sk-...", # Optional if you have an OPENAI_API_KEY set in the environment.
        )
    ),
)
# Start the runtime processing messages.
runtime.start()
agent_id = AgentId("simple_agent_context", "default")

# First question.
message = Message("Hello, what are some fun things to do in Seattle?")
print(f"Question: {message.content}")
response = await runtime.send_message(message, agent_id)
print(f"Response: {response.content}")
print("-----")

# Second question.
message = Message("What was the first thing you mentioned?")
print(f"Question: {message.content}")
response = await runtime.send_message(message, agent_id)
print(f"Response: {response.content}")

# Stop the runtime processing messages.
await runtime.stop()
Tools
自带的Tools
from autogen_core import CancellationToken
from autogen_ext.code_executors.docker import DockerCommandLineCodeExecutor
from autogen_ext.tools.code_execution import PythonCodeExecutionTool

# Create the tool.
code_executor = DockerCommandLineCodeExecutor()
await code_executor.start()
code_execution_tool = PythonCodeExecutionTool(code_executor)
cancellation_token = CancellationToken()

# Use the tool directly without an agent.
code = "print('Hello, world!')"
result = await code_execution_tool.run_json({"code": code}, cancellation_token)
print(code_execution_tool.return_value_as_string(result))
Examples of other built-in tools
LocalSearchToolandGlobalSearchToolfor using GraphRAG.mcp_server_toolsfor using Model Context Protocol (MCP) servers as tools.HttpToolfor making HTTP requests to REST APIs.LangChainToolAdapterfor using LangChain tools.
自定义的Tools
要创建自定义函数工具,您只需创建一个 Python 函数并使用 FunctionTool 类对其进行包装。FunctionTool 类使用描述和类型注释来通知LLM何时以及如何使用给定函数。描述提供有关函数用途和预期用例的上下文,而类型注释则告知LLM预期参数和返回类型。
import random

from autogen_core import CancellationToken
from autogen_core.tools import FunctionTool
from typing_extensions import Annotated


async def get_stock_price(ticker: str, date: Annotated[str, "Date in YYYY/MM/DD"]) -> float:
    # Returns a random stock price for demonstration purposes.
    return random.uniform(10, 200)


# Create a function tool.
stock_price_tool = FunctionTool(get_stock_price, description="Get the stock price.")

# Run the tool.
cancellation_token = CancellationToken()
result = await stock_price_tool.run_json({"ticker": "AAPL", "date": "2021/01/01"}, cancellation_token)

# Print the result.
print(stock_price_tool.return_value_as_string(result))
使用模型客户端调用tools
当 Model Client 获得工具列表时,它们可以生成工具调用。
import json

from autogen_core.models import AssistantMessage, FunctionExecutionResult, FunctionExecutionResultMessage, UserMessage
from autogen_ext.models.openai import OpenAIChatCompletionClient

# Create the OpenAI chat completion client. Using OPENAI_API_KEY from environment variable.
client = OpenAIChatCompletionClient(model="gpt-4o-mini")

# Create a user message.
user_message = UserMessage(content="What is the stock price of AAPL on 2021/01/01?", source="user")

# Run the chat completion with the stock_price_tool defined above.
cancellation_token = CancellationToken()
create_result = await client.create(
    messages=[user_message], tools=[stock_price_tool], cancellation_token=cancellation_token
)
create_result.content
client会返回tool call,即调用哪个函数、参数有哪些
然后我们本地执行工具
arguments = json.loads(create_result.content[0].arguments)  # type: ignore
tool_result = await stock_price_tool.run_json(arguments, cancellation_token)
tool_result_str = stock_price_tool.return_value_as_string(tool_result)
tool_result_str
将执行结果封装到 FunctionExecutionResult中,
# Create a function execution result
exec_result = FunctionExecutionResult(
    call_id=create_result.content[0].id,  # type: ignore
    content=tool_result_str,
    is_error=False,
    name=stock_price_tool.name,
)

# Make another chat completion with the history and function execution result message.
messages = [
    user_message,
    AssistantMessage(content=create_result.content, source="assistant"),  # assistant message with tool call
    FunctionExecutionResultMessage(content=[exec_result]),  # function execution result message
]
create_result = await client.create(messages=messages, cancellation_token=cancellation_token)  # type: ignore
print(create_result.content)
文章参考:
博客地址: qwrdxer.github.io
欢迎交流: qq1944270374
转载请注明来源,欢迎对文章中的引用来源进行考证,欢迎指出任何有错误或不够清晰的表达。可以在下面评论区评论,也可以邮件至 1944270374@qq.com